Thursday, December 1, 2016

How About Shell Art Therapy

I recently blogged about wood art therapy. How about shell art therapy, especially for those living along coastal areas that have shelling? Blogging about "therapy" makes it sound like I really need help. Well, maybe some people think I do, but I find these things add to my quality of life.

I live in NW Florida where the beaches are wonderful, but typically have no shells. However, several years ago we had beach nourishment due to erosion. The contractor brought in sand to pump onto the shore that contained shells. Well, I and my grandkids had a ball for two years collecting surface shells and digging for others. We came up with hundreds of neat ones. Now what to do with them? We made stuff.

When I talk about shelling for therapy, I mean finding them and creating objects. I love the "finding" phase. I can roam for hours with my head bent over looking for shells. When I go to an area known for shelling, I am up early after a storm checking to see what has washed up. When I am vacationing along a shell shore like SW Florida, I love taking a leisurely walk for exercise AND to look for shells. It is therapeutic for me. I come back to the beach chairs loaded with shells - mostly junk ones. But it is the "hunt" that is fun. After leaving, the junk shells normally go into the trash. The grandkids and I also try to find "shell holes" where shells had been buried under the sand. We found numerous pure treasures holes. Like finding pirate treasure.

We accumulated a lot of shells. Now what to do with them. We bought cheap frames from Michaels , pained them, and glued shells to the edges. Make super beachy frames.


Then we made some shell balls. Taking styrofoam balls and pressing in and gluing the shells. When I saw similar ones for sale at Pier 1 for $8, it did not bother me that we had spent hours working on them. It is the therapy and creating that counted for us. Normally we used small white shells. Sometimes we dyed them pastel, beach colors - fun look.


Then we took shells and filled glass vases, sometimes adding white beach sand on the bottom. Fun beach setting and free if you have the vase.

Then we took some medium shells and drilled a hole to make a necklace pendant. It was not a "Tiffany," but we made it and it had memories. I am sure it made it to the trash early on. We will just make more.


The result of all our efforts were and are numerous. I and my family had loads of fun finding and creating. This time is invaluable for memories. My granddaughter is 19 and we still talk about our shelling adventures. The shell process was and is a great therapeutic experience for me. I can lose myself for hours hunting for shells on the beach or creating. Who cares what the results look like, it is great for me. Sometimes, the result is good or better. We still have shell frames, shell balls, and shell filled vases displayed around the house. Each one has memories.

However, sometimes I found myself not appreciated. I found so many shells that I loved giving them to kids that were looking for them, but had found few. I would "seed" the area around where they were looking so they could find more. Then I started giving them to kids. Once, the mother gave me a very dirty look. I guess part of the "don't talk to strangers issue." From that point on, I always asked the parent before if I could give their kids some shells. Much better.

Mother Nature's products offer many ways to introduce free therapy into your life. I find that the first thing needed is to open my mind and ask myself "now, what can I make out of this." Often it is goofy, but who cares. I want to please myself and do not need approvals. It does help that I am semi retired and my efforts would equate to $.05 per hour or less. The process simply gives me internal pleasure.
Try it you might like it.

Thanks for listening to me. I might bore you, but I am having fun.
Life is great. Let's have fun while we are still able to.

John "Gabby" Gabrielson
Natural Creations
NW Florida, Land of Excitement and Beauty
612-816-5378

Have a great holiday season.


Sunday, November 27, 2016

Wood Art Therapy to Calm the Soul

An artist friend recently introduced me to wood art therapy. She was distraught by the election results and other things. She needed something creative to help calm the soul. She chose wood therapy as a form of meditation.

Wood therapy can be a form of mental therapy by losing oneself in the creation of something with wood. In the past, I have seen the benefits of working with wood. I lose myself in trying to create something unique. It does not have to be a masterpiece. It is the mental process of creating something with wood. Wood art is also fun to create with kids.

The easiest way to start is with simple things - random pieces of wood like driftwood or forest scraps, some twine, some glue, some wire, maybe some nails, a saw, maybe some rocks or shells, and paint. You don't need woodworking equipment or expertise for this. Simply an open mind to make something, regardless of how it looks. Take the blinders off.

Here are some examples of wood creativity using driftwood:


A great resource for ideas is Pinterest. Just search for driftwood, wood art, etc.

Ok, now that you might want to try, where do you start. First off, you need the wood pieces. Walk the beach to find driftwood, especially if you live in the NW. Walk thru a forest, picking up different types of scrap pieces. After a storm on large lakes like Superior or Michigan, check out the beaches. Look in your garage for old wood. Visit a saw mill to buy some unique wood scraps.

Then look around your house for odd "things": corks, wire, fabric, utensils. These can be incorporated into sculptures. Again, who cares what it looks like. The funkier the better.


Enjoy this simple form of therapy. It costs nothing, just time. Who knows what will evolve from it.

Have a great time. Mother Nature is awaiting your visit.

John Gabrielson
Natural Creations.

AMERICA THE GREAT.


Sunday, November 13, 2016

Old Mystical Beliefs on Warding off Bad Spirits

"Now it is the time of night
That the graves, all gaping wide,
Every one lets forth his sprite
In the church-way paths to glide.
William Shakespeare, A Midsummer Night’s Dream"
If you believe that haints, or spirits or other ghostly apparitions come out at night then you may need to build a bottle tree or dream catcher for protection. 
The first belief is the Bottle Tree. The belief in the bottle tree was believed to have been brought to America by the African slaves many years ago. 
Bottle tree colors can range from blue, to clear, to brown, but cobalt blue are always preferred: in the Hoodoo folk-magic tradition, the elemental blues of water and sky place the bottle tree at a crossroads between heaven and earth, and therefore between the living and the dead. The bottle tree interacts with the unknown powers of both creative and destructive spirits.
The bottles are placed upside down with the neck facing the trunk. Trees need not be thickly populated with bottles. Malevolent spirits, on the prowl during the night, enter the bottles where they become trapped by an “encircling charm”. It is said that when the wind blows past the tree, you can hear the moans of the ensnared spirits whistling on the breeze. Come morning they are burnt up by the rising sun.
Today, the bottle tree has entered the realm of folk art. Companies now market bottle tree armatures meant to serve, once clothed with milk, wine, or milk of magnesia bottles, as colorful garden ornaments. The poor man’s stained glass window, you might say.


The second mystical tool to ward off bad spirits is the Dream Catcher.

Dream catchers are one of the most fascinating traditions of Native Americans. The traditional dream catcher was intended to protect the sleeping individual from negative dreams, while letting positive dreams through. The positive dreams would slip through the hole in the center of the dream catcher, and glide down the feathers to the sleeping person below. The negative dreams would get caught up in the web, and expire when the first rays of the sun struck them.

The dream catcher originated as an American Indian belief to help ward off ward off bad dreams.
The Ojibwe people have an ancient legend about the origin of the dreamcatcher. Storytellers speak of the Spider Woman, known as Asibikaashi; she took care of the children and the people on the land. Eventually, the Ojibwe Nation spread to the corners of North America and it became difficult for Asibikaashi to reach all the children. So the mothers and grandmothers would weave magical webs for the children, using willow hoops and sinew, or cordage made from plants. The dreamcatchers would filter out all bad dreams and only allow good thoughts to enter our mind. Once the sun rises, all bad dreams just disappear.

Even infants were provided with protective charms. Examples of these are the "spiderwebs" hung on the hoop of a cradle board. These articles consisted of wooden hoops about 3½ inches in diameter filled with an imitation of a spider's web made of fine yarn, usually dyed red. In old times this netting was made of nettle fiber. Two spider webs were usually hung on the hoop, and it was said that they "caught any harm that might be in the air as a spider's web catches and holds whatever comes in contact with it.

Traditionally, the Ojibwe construct dreamcatchers by tying sinew strands in a web around a small round or tear-shaped frame of willow (in a way roughly similar to their method for making snowshoe webbing). The resulting "dream-catcher", hung above the bed, is used as a charm to protect sleeping people, usually children, from nightmares.

The Ojibwe believe that a dreamcatcher changes a person's dreams. According to Konrad J. Kaweczynski, "Only good dreams would be allowed to filter through... Bad dreams would stay in the net, disappearing with the light of day." Good dreams would pass through and slide down the feathers to the sleeper.


Pleasant dreams everyone. Don't let the boogey men get you.

John Gabrielson
Natural Creations.

Happy Thanksgiving to All.


Sunday, July 3, 2016

How to Finish Your Log - Part 3

OK, now you have an interesting log staring at you. What to do next?

You have a couple of options: 1) leave it as is in a rough state and put it in your house. The problem is, someone might think it is fire wood or your dog will use it is a depository for its urine. Not good, unless you live in the wilds of Alaska. Or option 2), finish it as a great piece of furniture which your dog will not dare touch.

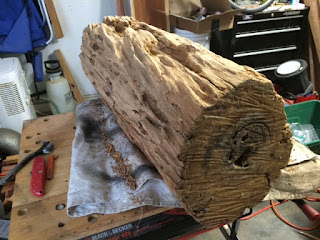
So, how do you finish the log? What is its rough condition? Here are some of the rough logs I picked up from the saw mill. Remember, they might look like junk, but these are the mill's assets which you need to pay for. One needs a certain amount of imagination looking at one of these and thinking of the potential. I will be showing my work with river reclaimed old sinker cypress. This is my main wood these days. They have a lot of character and are often more then 400 years old. However, my process will work with any suitable wood.

The saw mill yard with river reclaimed old sinker cypress logs. I try and find a discarded piece of one of these large logs.

Rough logs fresh from the mill.

More logs fresh from the mill.
My best ever log when finished.


Now you have your log/logs safe at your workshop. Next step is to clean the exterior of the remnants of "stuff" from the river or woods - bugs, weeds, silt, mud, poison ivy, animal droppings. Newer, none reclaimed logs can be a lot easier to clean. Best way is with a power washer. If you do not have this, then a hose and a brush with soap. 

Power washing can be a blast, but better wear old clothes.


Now your "future treasure" is nice and clean. What about any rot? What looks like rot in my cypress is actually fungus that ate away the tree while it was alive. Once harvested, the fungus died. Cypress is impervious to rot, so while they were under water, no rot has occurred. Other wood like pine, birch and maple will rot naturally. This rot needs to be removed prior to finishing or it will continue to damage the log. Here I am removing the fungus infected rot from sinker cypress logs. 

Chiseling away the bad wood. Sometimes there is nothing left. After a few bruised knuckles, I learned to wear a glove.

At this point, the log needs to be shaped and sanded to its final shape before finishing. One can feel like a Michalangelo creating a "David", well not quite. But the artist feeling can be there, or not. I have found angle grinders, belt sanders and orbital sanders work the best with various grit papers. Of course, there is the old elbow grease with hand sanding. The log needs to be smooth prior to applying the liquid finishes.


Sinker cypress stumps ready for finishes.

Heavily fungus infested stumps can create great configurations.

Now comes the fun stage - applying the final liquid finishes. A decision needs to be made on the tone and sheen you want. Will it be a dark tone, natural finish, or paint washed? Will it have a flat finish or have a gloss? And will it be a water based or oil based finish. I am assuming the stump will be indoors, due to the amount of work involved. If it will be located outside, then a number of the above steps can be shortened or eliminated. In order to preserve the color, I normally use 3-5 coats of sealer. If the stump will be oil stained, it will need to be sealed after this application. If it will remain natural, then no second sealer is needed. Here are examples of the various finishes:

Natural finish side table.

Dark stained finish coffee tables.

Natural finish side tables.

Stained finish cypress table.


Grey washed finish.

The tone of the table blends nicely with the interior decor.


Well friends, that is my process for converting a mud covered log into a great side or coffee table. All the above steps are important when you have that right piece of "Nature's Wonders." I have found this process to be very fun and satisfying in my "Life's Journey." AND the best of all, I can share my work with friends. 

LIFE IS GOOD. ENJOY EVERY MOMENT.

John "Gabby" Gabrielson
Natural Creations
www.naturalcreations.me


Tuesday, June 21, 2016

How to Select a Log for a Stump Table - Part II

Now you have decided on the type and use for your stump table. The next step is to decide on the type of wood.

Fortunately Nature has provided us with 100s of species of wood. From exotic Amazon woods to the abundant oaks, maples and elms of America. One will never run out of options. The limiting factors are the wood's location, rareness and cost. It is cheap to find a stump in your neighborhood, but if you want a beautiful piece from Africa, the cost will be high. Rather than looking for a specific species, you can simply start with an interesting piece of wood or stump you find. The key is to keep your mind open for all possible uses of a piece of wood. I started my stump table making by going to a local landscape dump. I noticed a pine log that was all dried and a nice size - I had noticed stump tables in designer magazines and thought it would be fun to try and create one. I went home, picked up my chain saw, went back to the dump and cut a couple of logs, took them to my garage workshop, and a hobby/business was formed.

My first stump tables

I will assume exotic woods are out and you want to keep the cost and availability reasonable. This will mean finding a local piece that will make a good table. Stumps can be unique in their configuration which results in a true one of a kind piece, or they can be uniform in shape - round, square, etc. The unique stumps will have unusual shapes, voids from fungus or rot, or be tree base roots. I have found soft woods are easier to work that hard woods like oak. There always seems to be a lot of sawing and sanding, so the softer the better. One thing about pine - the sap never stops running and is very messy.

OK, so where do you find a great log for a stump table? Again, one needs to keep their mind open for possibilities - think "yes, that would make a great table." I have found that many diamonds are hid in an ugly, mud covered log. Early on, I was lucky enough to find a relatively local saw mill. Not a big one, but something that is run by locals, out in the woods. Sure, New York and Chicago do not have a lot of "local mills." But their are mills a few hours drive away, in the woods someplace. Often these mills will have scraps and remnants from large logs, that can be reclaimed into tables. But remember, these might look like "scraps" to you, but they are the assets of the mill. You should be paying for these rough pieces.

Where else could you look for rough stumps? Whenever there is a bad storm, trees are blown down, especially those with a shallow root system. Go out after the storm and find a tree expert who is cleaning up the damage and buy one from them. They will love not to have to haul it away. How about your back yard? Are you planning to take down that old maple? Maybe a true treasure. Contact local tree experts to keep their eyes open for possibilities. Offer them a decent price so they will keep you in mind. Check out your local city. They are always clearing out some area which might have great stump potential.

A final word of advice - never pass up a possibility. Some of my best work started out as ugly little ducklings.

Rough cypress from the mill. Reclaimed from rivers.

Me and 2 of the 4 finished pieces.

The 3rd of the 4 finished pieces.
The 4th of the 4 finished pieces.

Have fun creating diamonds out of Mother Nature's wonders. It can be a true labor of love, creating one of a kind stump tables. However, never feel it could be a good money maker - IT ISN'T - trust me. It is just fun. Fortunately, I am retired and can afford to work my little creativity in this way. 

Have fun. Remember: we are only here for a brief visit, so enjoy every moment.
Smell Mother Nature's roses whenever you have a chance.

ENJOY

John "Gabby" Gabrielson
Natural Creations
www,naturalcreations.me


(Look for Part III - Finishing)


Tuesday, June 14, 2016

How to Select a Log for a Stump Table

OK, now you would like to make a stump table. You love the natural look of the wood, and it would fit nicely into your interior design plans. But, where to start? You could buy one ready made, or have the fun to create your own. This blog addresses making your own.

First off, you need to decide what type of stump table you want. It can be a side table, located beside a couch or chair. These are normally around 24" high, depending on the adjoining furniture. The diameter can be 12-15", again depending on its use. Do you want a glass top? This often depends on the amount of wood void on the top surface.

Dark finish cypress side table.

Natural finish cypress side tables.

Grey tone cypress side tables.

Natural finish cypress side table, original exterior.

sinker cypress side table in grey tone. 24" high.

Gabby with 24" sinker cypress side tables. Natural log.


The other type of stump table is the coffee table. These logs are generally larger, due to their use as a major table in the room. The height is around 17"+, plus a glass top. The diameter is a minimum of 15-18". The bigger the area, the bigger the log. Be careful, once the stumps get over 15", they are heavy.

Sinker cypress dual coffee table - 24" high.

Pecky cypress coffee table with natural finish. 20" high.

Sinker cypress coffee table. 1/2" glass added. 16" high.


You have now decided on what type of table you want and its approximate dimensions. The next stage is to decide on the type of wood you want, its configuration, any natural uniqueness, and its natural colors.

This stage will be covered in my next blog. Sorry, I go on Island Time - no deadlines. Whenever it happens it happens. Enjoy and see you next time. Take care and thanks for joining me.

John "Gabby" Gabrielson
In the Great Florida Panhandle

www.naturalcreations.me


Sunday, June 5, 2016

How to Determine the Age of a Tree

How does one determine the age of a tree? The easiest way is to count the life rings in a log. Each ring is a year life of the tree. Of course, it is impossible to do if the tree is standing and alive. One needs to wait until the tree is harvested, then examine the end cut of the tree base log. A tree's life ring determines the age. The ring is like a wood grain around the inner circumference of the log.

Original growth trees, ones that have not been replanted by man, often have 20 +/ rings per inch of the diameter. These trees can be 100s of years old. Here is an end cut of a reclaimed sinker cypress log. There are over 400 life rings on the piece. It was harvested in the late 1800s and laid at the bottom of a FL river until the 2000s. This makes this piece over 500 years old, around the time Columbus discovered America. Any logs this age are called "a Columbus" by the saw mill.


New growth trees are often fast grown commercially or have been privately planted as landscape elements. These can have only 3-5 life rings per inch of the diameter.


Growing conditions can also be shown by the tree rings. Drought years will result in tight, close rings. Abundant moisture will result in wider spaced rings. A forest burn will show as a black ring, if the tree lives. In an old reclaimed log piece, it is interesting to locate various events in history, i.e. the Age of the Renaissance, American revolution, War of 1812, WWI, etc.

Nature is indeed a wondrous place to enjoy.
Smell the Roses and have a great life.

John Gabrielson
Natural Creations