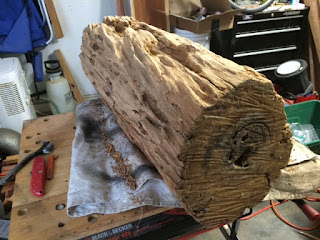
You have a couple of options: 1) leave it as is in a rough state and put it in your house. The problem is, someone might think it is fire wood or your dog will use it is a depository for its urine. Not good, unless you live in the wilds of Alaska. Or option 2), finish it as a great piece of furniture which your dog will not dare touch.
So, how do you finish the log? What is its rough condition? Here are some of the rough logs I picked up from the saw mill. Remember, they might look like junk, but these are the mill's assets which you need to pay for. One needs a certain amount of imagination looking at one of these and thinking of the potential. I will be showing my work with river reclaimed old sinker cypress. This is my main wood these days. They have a lot of character and are often more then 400 years old. However, my process will work with any suitable wood.
The saw mill yard with river reclaimed old sinker cypress logs. I try and find a discarded piece of one of these large logs.
Rough logs fresh from the mill.
More logs fresh from the mill.
My best ever log when finished.
Now you have your log/logs safe at your workshop. Next step is to clean the exterior of the remnants of "stuff" from the river or woods - bugs, weeds, silt, mud, poison ivy, animal droppings. Newer, none reclaimed logs can be a lot easier to clean. Best way is with a power washer. If you do not have this, then a hose and a brush with soap.
Power washing can be a blast, but better wear old clothes.
Now your "future treasure" is nice and clean. What about any rot? What looks like rot in my cypress is actually fungus that ate away the tree while it was alive. Once harvested, the fungus died. Cypress is impervious to rot, so while they were under water, no rot has occurred. Other wood like pine, birch and maple will rot naturally. This rot needs to be removed prior to finishing or it will continue to damage the log. Here I am removing the fungus infected rot from sinker cypress logs.
Chiseling away the bad wood. Sometimes there is nothing left. After a few bruised knuckles, I learned to wear a glove.
At this point, the log needs to be shaped and sanded to its final shape before finishing. One can feel like a Michalangelo creating a "David", well not quite. But the artist feeling can be there, or not. I have found angle grinders, belt sanders and orbital sanders work the best with various grit papers. Of course, there is the old elbow grease with hand sanding. The log needs to be smooth prior to applying the liquid finishes.
Sinker cypress stumps ready for finishes.
Heavily fungus infested stumps can create great configurations.
Now comes the fun stage - applying the final liquid finishes. A decision needs to be made on the tone and sheen you want. Will it be a dark tone, natural finish, or paint washed? Will it have a flat finish or have a gloss? And will it be a water based or oil based finish. I am assuming the stump will be indoors, due to the amount of work involved. If it will be located outside, then a number of the above steps can be shortened or eliminated. In order to preserve the color, I normally use 3-5 coats of sealer. If the stump will be oil stained, it will need to be sealed after this application. If it will remain natural, then no second sealer is needed. Here are examples of the various finishes:
Natural finish side table.
Dark stained finish coffee tables.
Natural finish side tables.
Stained finish cypress table.
Grey washed finish.
The tone of the table blends nicely with the interior decor.
Well friends, that is my process for converting a mud covered log into a great side or coffee table. All the above steps are important when you have that right piece of "Nature's Wonders." I have found this process to be very fun and satisfying in my "Life's Journey." AND the best of all, I can share my work with friends.
LIFE IS GOOD. ENJOY EVERY MOMENT.
John "Gabby" Gabrielson
Natural Creations
www.naturalcreations.me


0 comments:
Post a Comment